
On April 19th, during the ICT Days, I presented a talk entitled "Hands-on Development of Web Applications with Java EE 6". Given that I only had an hour for the presentation, it was not really a "Hands On" talk because I didn’t have the time to allow the audience to implement whatever I was implementing and try for themselves, so it ended up being a demonstration of implementing a Java EE 6 Web Profile application using Eclipse and MySQL.
However, as always, I have no idea of how long demonstrating (and explaining) the development of an application takes, so I was only able to show how to create the project, apply a visual layout with Facelets and create the tables on the database from the relational mapping in the domain classes automatically with JPA/Hibernate. I didn’t have time to implement a single complete functionality of the application.
Therefore, the goal of this post is to provide a step-by-step instruction on how to implement the Web application that I started demonstrating in the event. And since I’m writing this, I’ll also show how to install the necessary tools for the job, which wasn’t included in the demonstration either. If you prefer, you can also/instead download the slides and the source code of the demonstration.
Installing the necessary tools
Because I don’t have the time to test it in other platforms, I’ll show here instructions for installing the tools on an Ubuntu Linux 12.04 32-bits distribution and the reader should adapt those to his/her operating system if necessary.
First of all, you should download the following files (names may vary a little if new versions are released):
- [cci]eclipse-jee-indigo-SR2-linux-gtk.tar.gz[/cci]: visit the Eclipse download page and download the Eclipse IDE for Java EE Developers package;
- [cci]jboss-as-web-7.0.2.Final.tar.gz[/cci]: visit the JBoss Application Server download page and download the 7.0.2.Final, Web Profile Only (Java EE6 Certified) version;
- [cci]mysql-connector-java-5.1.19.tar.gz[/cci]: visit the MySQL Connector/J download page and download the latest version;
- [cci]templatemo_104_hotel.zip[/cci]: visit this blog post and choose a template that you like. I chose Hotel & Travel free layout.
Copy all these files to a specific directory in your system (e.g., [cci]/home/vitor/HandsOn[/cci]) and unpack them (creating the folders [cci]/home/vitor/HandsOn/eclipse[/cci], [cci]/home/vitor/HandsOn/jboss-as-web-7.0.2.Final[/cci], [cci]/home/vitor/HandsOn/mysql-connector-java-5.1.19[/cci] and [cci]/home/vitor/HandsOn/templatemo_104_hotel[/cci]). That’s all you need to do to install Eclipse and JBoss in a Linux system (other systems might provide a install wizard). Files from MySQL Connector/J and the visual layout will be used later on.
You will also need to install the MySQL database server and some GUI frontend to manipulate it. On Ubuntu, just install the [cci]mysql-server[/cci] package and download the DEB package for MySQL Workbench from the MySQL Workbench download page (you might also need to install some old versions of packages [cci]libmysqlclient16[/cci] — here — and [cci]libzip1[/cci] — here). For other systems, visit the MySQL downloads page and download the server and the workbench for your OS.
The next steps are creating the database for our application, configuring JBoss to connect to the database and provide a data source for it and, finally, configure Eclipse to manage the JBoss server.
Creating the database in MySQL
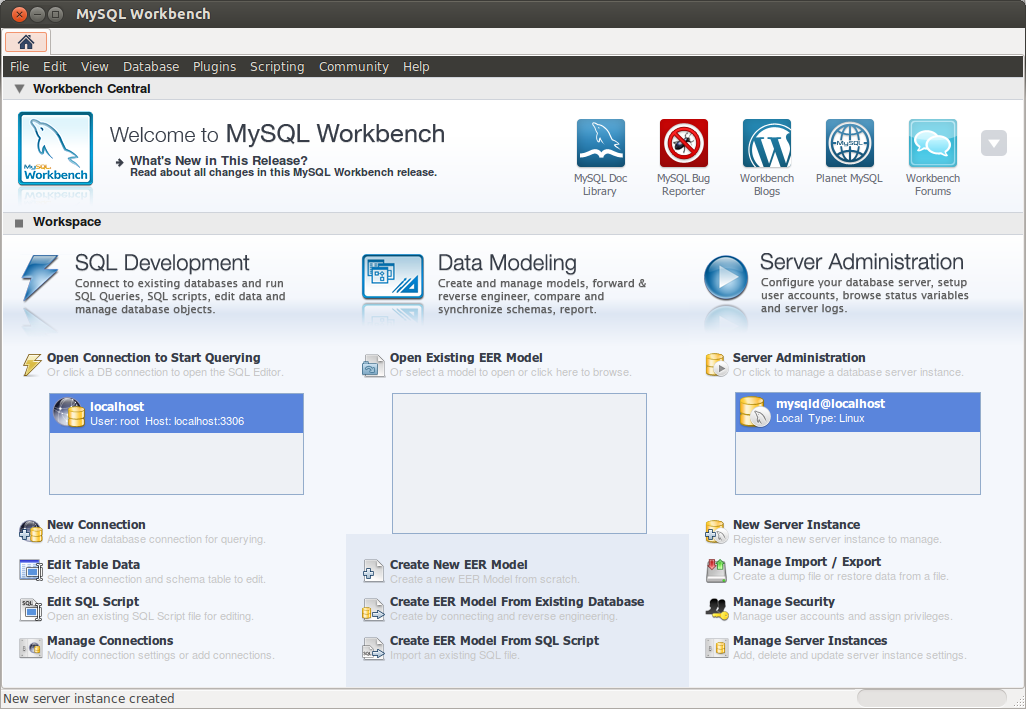
To create the database for the demonstration, open the MySQL Workbench and click the New Server Instance link under Server Administration. Follow the wizard to connect to your local MySQL server. If successful, the wizard will create a server instance in Server Administration and also a connection in SQL Development, as shown in the figure below.
Double click the connection to open the SQL editor, click on the icon at the toolbar to create a new database (this one: ![]() ) and name it [cci]javahostel[/cci]. Close the SQL editor to return back to the workbench’s main window.
) and name it [cci]javahostel[/cci]. Close the SQL editor to return back to the workbench’s main window.
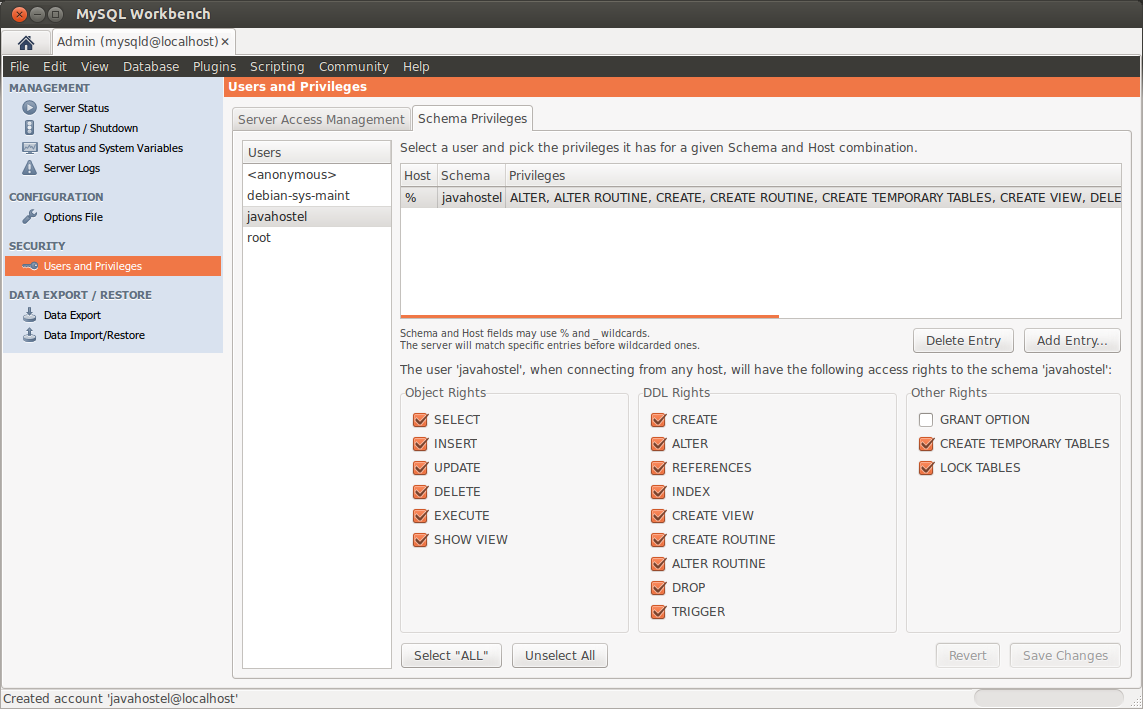
Now, click on Manage Security under Server Administration to open the Users and Privileges administration console. Click on Add Account and add a new user with the following data:
- Login Name: [cci]javahostel[/cci]
- Limit Connectivity to Hosts Matching: [cci]localhost[/cci]
- Password: [cci]javahostel[/cci]
- Confirm Password: [cci]javahostel[/cci]
After clicking on Apply to save the new user, go to the Schema Privileges tab, select the javahostel user on the left, click on the Add Entry… button, select the Selected schema option and choose the javahostel schema on the right-hand side list, clicking OK. After the dialog is closed, click the Select "ALL" button and, finally, Save Changes. The result is shown in the figure below:
Configuring the data source in JBoss
To have JBoss connect to the database we have just created and provide a data source to our application, we need to create a module for MySQL Connector/J in the server and add a [cci_xml]
To configure JBoss, follow the steps below:
- Go to the folder [cci]$JBOSS_HOME/modules/com/[/cci] and create the directory [cci]mysql[/cci]. Enter the directory you have just created and create a sub-directory [cci]main[/cci];
- Copy the file [cci]$CONNECTORJ_HOME/mysql-connector-java-5.1.19-bin.jar[/cci] to [cci]$JBOSS_HOME/modules/com/mysql/main/[/cci];
- Create a new file called [cci]$JBOSS_HOME/modules/com/mysql/main/module.xml[/cci] with the following contents:
- Making sure that the JBoss server is not running, edit the file [cci]$JBOSS_HOME/standalone/configuration/standalone.xml[/cci], look for the [cci_xml]
[/cci_xml] tag and add a new [cci_xml] [/cci_xml] child to it (there should already be one datasource there. You can leave it and add this one after it): - Still in this file, locate the [cci_xml]
[/cci_xml] tag inside the [cci_xml] [/cci_xml] configuration and add a new driver for MySQL Connector/J (there should already be one driver there. Again, leave it and add the new one after it):
[cc_xml]
[cc_xml]
[cc_xml]
The next time you start the server, JBoss should provide a data source with the JNDI name [cci_java]java:/jboss/datasources/JavaHostel[/cci_java] for our application. We will use it later.
Configuring Eclipse to manage the JBoss server
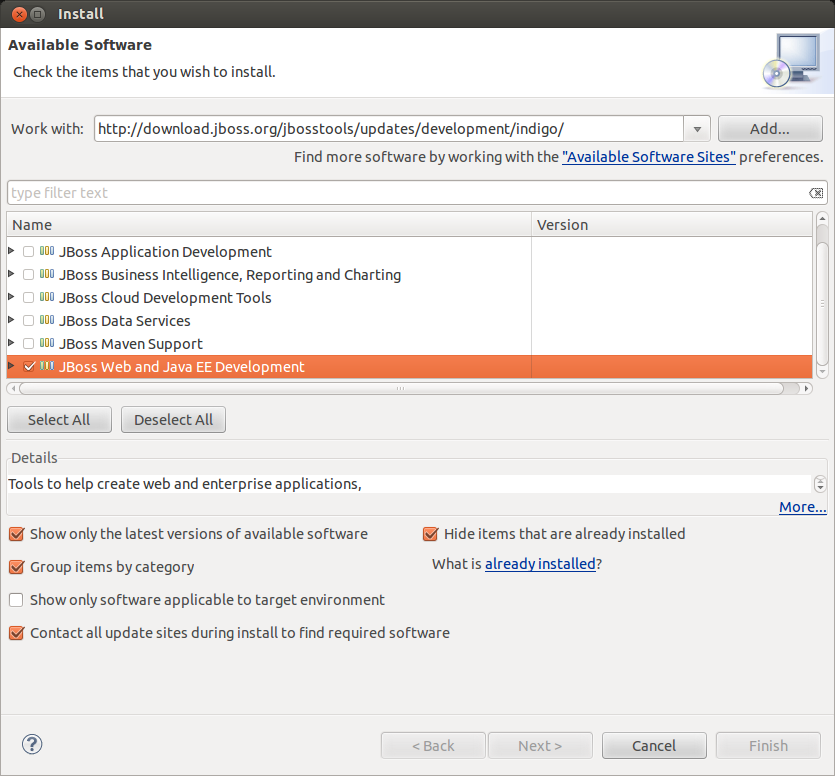
The last configuration step before we start developing the application is to set up Eclipse to manage the JBoss server. Considering that [cci]$ECLIPSE_HOME[/cci] represents the directory where Eclipse was unpacked (in my case, [cci]/home/vitor/HandsOn/eclipse[/cci]), execute [cci]$ECLIPSE_HOME/eclipse[/cci] ([cci]$ECLIPSE_HOME/eclipse.exe[/cci] on Windows) to open Eclipse. Then, click on Help > Install New Software…, fill in the Work with: field with the JBoss Tools repository ([cci]http://download.jboss.org/jbosstools/updates/development/indigo/[/cci]), press Enter and wait while Eclipse loads the list below. Once that’s done, select the item JBoss Web and Java EE Development, like shown in the picture below:
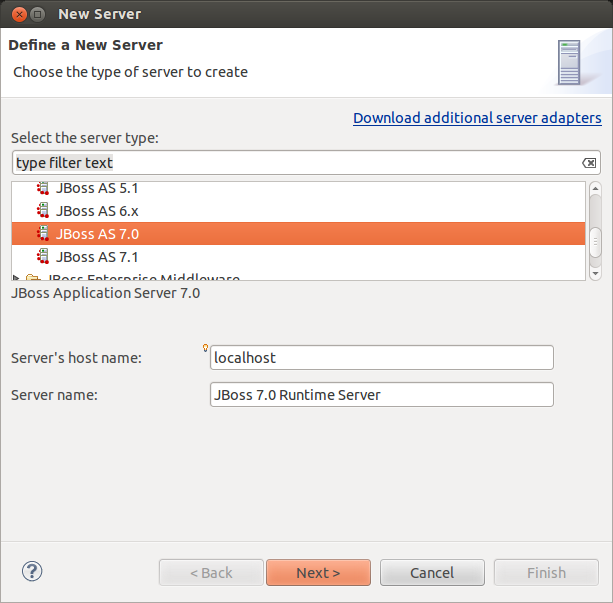
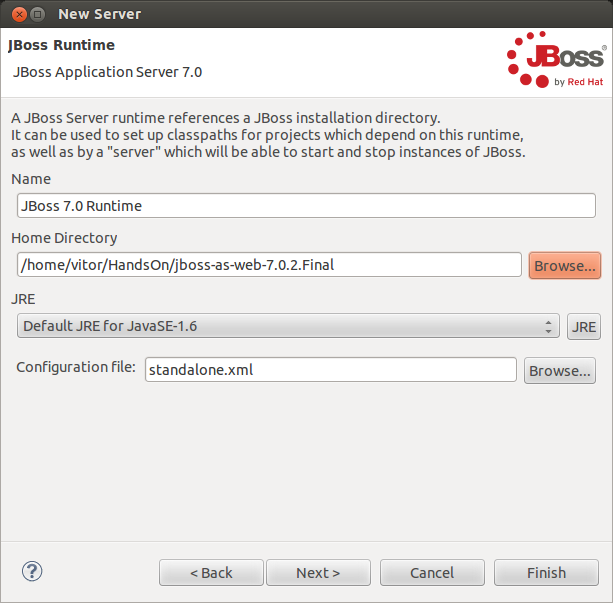
Click Next and continue the install wizard, restarting Eclipse at the end of the installation. Once Eclipse is restarted, open the Servers view (if you can’t see it, click on Window > Show View > Other… and select it from the list) and click on the create a new server link that is shown (if you don’t see a link, right-click on the blank space in the view and select New > Server). In the New Server window, select the JBoss AS 7.0 from the list and click Next, as shown below:
In the next part of the New Server wizard, click the Browse… button next to the Home Directory field and point Eclipse to the directory where JBoss was installed (again, in my case it was [cci]/home/vitor/HandsOn/jboss-as-web-7.0.2.Final[/cci]). The figure below shows the result:
Click Finish and the JBoss Server should now appear in the Servers view. Right-click it and select Start to start the server. Wait for a few seconds and the Console view will show up with the server’s log. Onde the log indicates that the server has finished starting, open your browser and point it to http://localhost:8080/ to confirm that JBoss is running.
Creating the project with a free layout from the Web
If everything went well so far, you are ready to start developing the application. First of all, create the project by clicking on File > New > Dynamic Web Project and filling in the following information:
- Project name: [cci]JavaHostel[/cci]
- Target runtime: [cci]JBoss 7.0 Runtime[/cci] (should be the default, but if you have other servers installed, one of them might be selected)
Click Next twice to advance the new project wizard and mark the option Generate web.xml deployment descriptor, then click Finish to have Eclipse create the project.
For this demonstration, we will use three components of the Java EE 6 Web Profile specification: Contexts and Dependency Injection (CDI), JavaServer Faces (JSF) and the Java Persistence API (JPA). In order to use them, we need to add their facets to our project. Right-click the JavaHostel project and select Properties. In the Properties window, select the Project Facets item in the left-hand side list and mark the three aforementioned technologies: CDI, JavaServer Faces and JPA. Click OK and wait until Eclipse adds the facets.
Once you are back in Eclipse’s workbench, the next step is to configure the database connection, otherwise JBoss will throw an exception when we try to deploy our application because we chose to use JPA and didn’t configure it. In the Project Explorer view, locate and open the item JavaHostel/JPA Content/persistence.xml and fill in the following information:
- In the General tab, Persistence provider: [cci]org.hibernate.ejb.HibernatePersistence[/cci]
- In the Connection tab, JTA data source: [cci]java:/jboss/datasources/JavaHostel[/cci]
- In the Properties tab, click on Add… and fill in Name: [cci]hibernate.hbm2ddl.auto[/cci] / Value: [cci]create[/cci]
With that out of the way, let’s apply the web template using Facelets, a technology that is part of JSF 2.0. Follow the steps below:
- Create a new folder in your project: JavaHostel/WebContent/resources;
- Open the folder that you have extracted from the free web template that was downloaded as instructed in the beginning of this post (in my case, [cci]/home/vitor/HandsOn/templatemo_104_hotel[/cci]) and copy the [cci]templatemo_style.css[/cci] file and the [cci]images[/cci] directory to the newly created folder in Eclipse;
- Right-click JavaHostel/WebContent/resources and select New > HTML File, name it [cci]decorator.xhtml[/cci] and use the New XHTML File (1.0 transitional) template to create the Facelets decorator. Using the [cci]index.html[/cci] file from the downloaded web template as base, edit the decorator so it ends up like below (basically, we added the necessary namespaces, replaced the HTML [cci_xml][/cci_xml] and [cci_xml][/cci_xml] with JSF tag components [cci_xml]
- Next, right-click JavaHostel/WebContent and select New > HTML File, name it [cci]index.xhtml[/cci] and use the New XHTML File (1.0 transitional) template to create the application’s home page. This time, you should delete the entire [cci_xml] [/cci_xml] tag and replace it with a Facelet’s [cci_xml]
- Since we’re using the JSF facet and haven’t changed its default configuration, Eclipse configured the [cci]web.xml[/cci] file to redirect requests to the JSF Servlet if they start with [cci]/faces/[/cci]. So, at this point, to open the homepage we would have to access the URL [cci]http://localhost:8080/JavaHostel/faces/index.xhtml[/cci]. We would like to redirect requests to [cci]http://localhost:8080/JavaHostel/[/cci] to this page, so we create the [cci]index.html[/cci] file (notice this time it’s html, not xhtml) in JavaHostel/WebContent with the following contents:
[cc_xml]

[/cc_xml]
[cc_xml]
Welcome to JavaHostel
Under development.
[/cc_xml]
[cc_html]
[/cc_html]
The redirection will work because the file [cci]index.html[/cci] was configured by Eclipse as one of the welcome files of the application. To see this list, open the file JavaHostel/WebContent/WEB-INF/web.xml. If you want, you can remove the other welcome file entries, leaving only the [cci]index.html[/cci] one.
To deploy the application and test it, open the Servers view, right-click the JBoss server, click on Add and Remove…, select the JavaHostel project, click on Add, then Finish. If the server was already running, wait until the console shows up with the log entries indicating that the application has been deployed. Otherwise, start the server and wait, like before. Then, open http://localhost:8080/JavaHostel/ and you should see your home page with the proper visual layout.
Implementing the domain classes and creating the database tables
Before implementing any functionality, we need classes to represent concepts from the domain. If you haven’t attended the Hands On session in ICT Days, you might have noticed from the instructions before that we are building the website for a hostel so people can register as guests and make reservations. Therefore we need classes to represent guests, rooms, beds and bookings.
Furthermore, we should map these classes using JPA’s annotations for object/relational mapping, so we can persist and retrieve objects from the database. Plus, when we configured JPA before, we added a property for Hibernate (the JPA implementation that comes with JBoss) that instructs it to create the database table automatically for us based on this mapping.
So, right-click JavaHostel/Java Resources/src and select New > Package to create the package [cci]it.ictdays.javahostel.domain[/cci]. Then, right-click the package and select New > Class to create the four classes: [cci]Guest[/cci], [cci]Booking[/cci], [cci]Bed[/cci] and [cci]Room[/cci]. Then implement these classes as shown in the source codes below:
[cc_java]package it.ictdays.javahostel.domain;
import java.util.Date;
import javax.persistence.Entity;
import javax.persistence.GeneratedValue;
import javax.persistence.GenerationType;
import javax.persistence.Id;
import javax.persistence.Temporal;
import javax.persistence.TemporalType;
@Entity
public class Guest {
@Id @GeneratedValue(strategy = GenerationType.AUTO) private Long id;
private String name;
private String email;
private String password;
@Temporal(TemporalType.DATE) private Date birthDate;
protected Long getId() {
return id;
}
protected void setId(Long id) {
this.id = id;
}
public String getName() {
return name;
}
public void setName(String name) {
this.name = name;
}
public String getEmail() {
return email;
}
public void setEmail(String email) {
this.email = email;
}
public String getPassword() {
return password;
}
public void setPassword(String password) {
this.password = password;
}
public Date getBirthDate() {
return birthDate;
}
public void setBirthDate(Date birthDate) {
this.birthDate = birthDate;
}
}[/cc_java]
[cc_java]package it.ictdays.javahostel.domain;
import java.util.Date;
import java.util.Set;
import javax.persistence.Entity;
import javax.persistence.GeneratedValue;
import javax.persistence.GenerationType;
import javax.persistence.Id;
import javax.persistence.ManyToOne;
import javax.persistence.OneToMany;
import javax.persistence.Temporal;
import javax.persistence.TemporalType;
@Entity
public class Booking {
@Id @GeneratedValue(strategy = GenerationType.AUTO) private Long id;
@ManyToOne private Guest guest;
@OneToMany private Set
@Temporal(TemporalType.DATE) private Date startDate;
@Temporal(TemporalType.DATE) private Date endDate;
protected Long getId() {
return id;
}
protected void setId(Long id) {
this.id = id;
}
public Guest getGuest() {
return guest;
}
public void setGuest(Guest guest) {
this.guest = guest;
}
public Set
return beds;
}
public void setBeds(Set
this.beds = beds;
}
public Date getStartDate() {
return startDate;
}
public void setStartDate(Date startDate) {
this.startDate = startDate;
}
public Date getEndDate() {
return endDate;
}
public void setEndDate(Date endDate) {
this.endDate = endDate;
}
}[/cc_java]
[cc_java]package it.ictdays.javahostel.domain;
import javax.persistence.Entity;
import javax.persistence.GeneratedValue;
import javax.persistence.GenerationType;
import javax.persistence.Id;
import javax.persistence.ManyToOne;
@Entity
public class Bed {
@Id @GeneratedValue(strategy = GenerationType.AUTO) private Long id;
@ManyToOne private Room room;
private int number;
private double pricePerNight;
protected Long getId() {
return id;
}
protected void setId(Long id) {
this.id = id;
}
public Room getRoom() {
return room;
}
public void setRoom(Room room) {
this.room = room;
}
public int getNumber() {
return number;
}
public void setNumber(int number) {
this.number = number;
}
public double getPricePerNight() {
return pricePerNight;
}
public void setPricePerNight(double pricePerNight) {
this.pricePerNight = pricePerNight;
}
}[/cc_java]
[cc_java]package it.ictdays.javahostel.domain;
import java.util.Set;
import javax.persistence.CascadeType;
import javax.persistence.Entity;
import javax.persistence.GeneratedValue;
import javax.persistence.GenerationType;
import javax.persistence.Id;
import javax.persistence.OneToMany;
@Entity
public class Room {
@Id @GeneratedValue(strategy = GenerationType.AUTO) private Long id;
private int number;
@OneToMany(cascade = CascadeType.ALL, mappedBy = “room”)
private Set
protected Long getId() {
return id;
}
protected void setId(Long id) {
this.id = id;
}
public int getNumber() {
return number;
}
public void setNumber(int number) {
this.number = number;
}
public Set
return beds;
}
public void setBeds(Set
this.beds = beds;
}
}[/cc_java]
In the above code, we have basically added some properties and associations to these classes, including an [cci]id[/cci] property that is required by the object/relational mapping. Then we annotated each class with [cci_java]@Entity[/cci_java] to indicate that we would like to make them persistent. By default, attributes of a persistent class are persistent, but some of them require additional configuration, such as the dates (specifying that we are insteresting only in the dates, not the times) and the associations (including a bi-directional association between [cci]Room[/cci] and [cci]Bed[/cci], which has to be properly configured in the one side (in this case, one room can have many beds) so that JPA knows the attributes [cci]Room.beds[/cci] and [cci]Bed.room[/cci] relate to the same association.
After coding these classes, Eclipse will complain that we have not indicated them as mapped classes in JPA’s configuration. Although we could open JavaHostel/JPA Content/persistence.xml and add them manually, a faster solution is to right-click the project and open its Properties, then select the JPA item in the left and mark the option Discover annotated …, so Eclipse adds all classes with [cci_java]@Entity[/cci_java] annotation to the list of JPA mapped classes automatically.
Here, we have only used basic persistence mappings, but the Web Profile also includes the Bean Validation component, which allows us to add constraints such as [cci_java]@NotNull[/cci_java], [cci_java]@Size[/cci_java], etc. to attributes. However, we will not cover these in this post.
At this point, if you redeploy the application by right-clicking it under the JBoss server in the Servers view and selecting Full publish, you can go back to the MySQL Workbench, open the SQL editor again and check that tables and columns have been created for the [cci]javahostel[/cci] database.
Implementing guest registration
Finally, it’s time to implement the first real functionality of the application (and, unfortunately, this is the part I didn’t have time to do during the ICT Days presentation): guest registration. We start by adding a link to our decorator, so registration can be accessed from the menu at the top of the page. Locate Link 01 in the file JavaHostel/WebContent/resources/decorator.xhtml and change it to:
[cc_xml]
[/cc_xml]
The variable [cci]#{facesContext.externalContext.requestContextPath}[/cci] contains a string that represents the path to our application on the server, i.e., /JavaHostel. This way, no matter what is the path of the page that is currently opened, we refer to the registration page using its full path, not a relative one (which would be complicated to calculate).
If the URL is pointing to [cci]/faces/registration/index.xhtml[/cci], we have to create the file JavaHostel/WebContent/registration/index.xhtml with the contents of this page. I suggest you do it by copying JavaHostel/WebContent/index.xhtml so you don’t have to manually write Facelet’s [cci_xml]
[cc_xml]
Registration
Fill in your data to become a guest at Java Hostel.
Name:
Birthdate:
E-mail:
Password:
[/cc_xml]
The page contains a form that should be filled out by the guest for registration. The fields of the form refer to properties of an object that we referred to using Expression Language as [cci_java]#{registrationController.guest}[/cci_java] and the command button at the end is calling a method in this same [cci_java]#{registrationController}[/cci_java] bean. This is where CDI comes in. We have to provide a controller component that contains an accessible [cci]guest[/cci] attribute (which, judging by the fields in the form, should be of the class [cci]Guest[/cci]) and the [cci_java]register()[/cci_java] method and, moreover, responds by the name of [cci]registrationController[/cci]. We do this as shown next:
[cc_java]package it.ictdays.javahostel.control;
import java.io.Serializable;
import it.ictdays.javahostel.application.RegistrationService;
import it.ictdays.javahostel.application.UnderAgeGuestException;
import it.ictdays.javahostel.domain.Guest;
import javax.ejb.EJB;
import javax.enterprise.context.SessionScoped;
import javax.inject.Named;
@Named
@SessionScoped
public class RegistrationController implements Serializable {
@EJB
private RegistrationService registrationService;
private Guest guest = new Guest();
private int age;
public Guest getGuest() {
return guest;
}
public int getAge() {
return age;
}
public String register() {
try {
registrationService.register(guest);
}
catch (UnderAgeGuestException e) {
age = e.getAge();
return “/registration/underage.xhtml”;
}
return “/registration/success.xhtml”;
}
}[/cc_java]
All we have to do is add a [cci_java]@Named[/cci_java] annotation to the class and it will be automatically available to any JSF web page with the same name of the class, but changing the first letter to lower case (you can set a different name in the [cci_java]@Named[/cci_java] annotation if you want). We have also added a [cci_java]@SessionScoped[/cci_java] annotation to indicate we would like the scope of the instances of this class to be the user session, i.e., CDI will create an instance for every user, when needed, and there will be at most one instance per user.
We see in the class definition the [cci]guest[/cci] attribute (accessible via the public [cci_java]getGuest()[/cci_java] method) and the [cci_java]register()[/cci_java] method that was called by the command button. This method returns a String, so it means that JSF will redirect the user to the page specified in the return value of this method. Looking at its implementation, notice that we are calling a [cci_java]register()[/cci_java] in some other class (thus, separating control and application) and, if all goes well, we go to the [cci]/registration/success.xhtml[/cci] page. However, judging by the birth date informed in the form, if the guest is underage (let’s imagine minors are not allowed to register) this application method will throw a [cci]UnderAgeGuestException[/cci], which will tell the controller to redirect instead to [cci]/registration/underage.xhtml[/cci].
We will create these pages later. Right now, we will focus on the application class and this business exception. First of all, notice that an instance of the application class is never created by the controller. Instead, it informs CDI that it depends on it by annotating the [cci]registrationService[/cci] attribute with the [cci_java]@EJB[/cci_java] annotation (which is used if the dependency is an Enterprise Java Bean, otherwise we use [cci_java]@Inject[/cci_java]). Once the web page refers to [cci_java]#{registrationController}[/cci_java] and CDI is asked to create an instance of [cci]RegistrationController[/cci], it will also check if an instance of [cci]RegistrationService[/cci] has already been created (in the appropriate scope), creating if it hasn’t, and injecting it in the new controller instance. Everything is automatic.
Let’s then see the code for the application class and the exception it throws:
[cc_java]package it.ictdays.javahostel.application;
import it.ictdays.javahostel.domain.Guest;
import java.io.Serializable;
import java.util.Calendar;
import java.util.Date;
import javax.ejb.LocalBean;
import javax.ejb.Stateless;
import javax.persistence.EntityManager;
import javax.persistence.PersistenceContext;
@Stateless
@LocalBean
public class RegistrationService implements Serializable {
@PersistenceContext
private EntityManager entityManager;
public void register(Guest guest) throws UnderAgeGuestException {
int age = calculateAge(guest.getBirthDate());
if (age < 18) throw new UnderAgeGuestException(age);
entityManager.persist(guest);
}
private static int calculateAge(Date birthDate) {
if (birthDate == null) return 0;
Calendar birth = Calendar.getInstance();
birth.setTime(birthDate);
Calendar today = Calendar.getInstance();
today.setTime(new Date(System.currentTimeMillis()));
int age = today.get(Calendar.YEAR) - birth.get(Calendar.YEAR);
birth.add(Calendar.YEAR, age);
if (birth.after(today)) age--;
return age;
}
}[/cc_java]
[cc_java]package it.ictdays.javahostel.application;
public class UnderAgeGuestException extends Exception {
private int age;
public UnderAgeGuestException(int age) {
this. age = age;
}
public int getAge() {
return age;
}
}[/cc_java]
The application class was defined as a [cci_java]@Stateless @LocalBean[/cci_java], which means: (a) that this is an EJB that does not hold state (it has no attributes) and, therefore, can be managed by the server in a pool of instances that will be "randomly" given to users as they need them; and (b) that the EJB does not define an interface, and it should be inferred automatically by the server (in the past, all EJBs should define an interface which indicated the services available). The only service available is the [cci_java]register()[/cci_java] method, which uses the private [cci_java]calculateAge()[/cci_java] method to calculate the guest's age and decide if it can be registered (18 years-old and over) or if an exception should be thrown (under 18). The exception stores the guest's age, which is then made available by the controller through the [cci]age[/cci] attribute's public accessor method (check back the source code for [cci]RegistrationController[/cci] to see it!).
If it decides to register the guest, it does so by calling the [cci_java]persist()[/cci_java] method in an instance of [cci]EntityManager[/cci] which, as with any other dependency, hasn't been created. Instead, the [cci]entityManager[/cci] attribute is annotated with [cci_java]@PersistenceContext[/cci_java], which tells CDI to ask JPA for the entity manager, i.e., the component that allows us to store objects in our database.
Now we can see the big picture: the form in the web page will bind the values of the fields to an instance of the class [cci]Guest[/cci] that is one of the attributes of the controller and, by clicking on the command button, will call the [cci_java]RegistrationController.register()[/cci_java] method. In its turn, this method calls the [cci_java]register()[/cci_java] method in an instance of the application class that was injected by CDI. The application class checks the guest's age and throws an exception if he/she is minor. Otherwise, it stores the data of the guest in the database. Back to the controller, if the exception was thrown the browser will be redirected to [cci]/registration/underage.xhtml[/cci], otherwise it will be sent to [cci]/registration/success.xhtml[/cci]. These pages are seen below:
[cc_xml]
Registration
Dear
[/cc_xml]
[cc_xml]
Registration
Dear
[/cc_xml]
Note how the underage result (the first one) accesses the value of the [cci]age[/cci] attribute that was set using the age value stored in the exception, and also how both pages refer to the guest’s name. At this point you can do a full publish again and, if there are no bugs, you can try to register a minor and an adult to see the different results. In the latter case, go back to the MySQL Workbench and check if a row was really added to the [cci]GUEST[/cci] table!
Just the beginning…
This tutorial just scratched the surface of Java EE 6 and its Web Profile. There are many more things to learn, such as Bean Validation (which I mentioned earlier), AJAX access, advanced JPA features, internationalization and more. Hopefully this tutorial can help you kickstart your project and then continue to learn about the Java EE standard on your own. If you liked it, please +1 me at the top and if you have any questions just leave a comment below…
Happy programming!